Welcome to Yummy Fixins!

Thanks so much for checking out my blog. My name is Arica, I am a Personal Chef serving the Lake Tahoe area. Please visit my new website at www.yummyfixins.com

Cooking is my passion, I love spending time in the kitchen creating yummy dishes. I originally created this blog to share healthy yummy recipes with my friends and family but now I'm sharing them with the world. Most of the dishes you will find here are very healthy and can be altered to fit any dietary restrictions. I hope you will find something delicious!


Monday, February 24, 2014

Roasted Cod Filets with Parsley & Shallot Panko Crust

What an easy, yummy and healthy dinner! This was my first time cooking cod and it was a total success. The flavors of the lemon and parsley taste so wonderful with this fish. I'm sure the recipe would work with any white flaky fish but I chose a nice thick piece of cod. Your cook time will change based on the thickness of the fish you purchase. You should cook fish for 8-10 minutes per inch of thickness. If the fish starts to flake while cooking it is most likely over done. Make sure you check it 8 minutes into the dish and most importantly make sure your oven temperature is accurate. Fish is so easy to cook and great for you so go ahead and give this yummy recipe a try! 

Ingredients
4 cod filets
1 1/2 cup panko bread crumbs
2 tbs olive oil
1/2 cup, loose parsley1 shallot
2 garlic clove
zest from half a lemon, save other half for garnish


Preheat oven to 400. Dice the parsley, shallot and garlic. Heat the 1 tbs of the oil in a small pan to medium heat then add in the parsley mixture along with the lemon zest. Cook for 3-5 minutes stirring occasionally, careful not to fry the mixture. Remove from heat and stir in the bread crumbs with 1 tbs of olive oil, mixing well. Place the cod in an oiled baking pan, lightly coating both side of the fish with oil from the pan. Carefully place the bread crumb mixture on the top of the fish making sure to coat as much as possible. Bake for 8-10 minutes. 

Serve with lemon wedge. 

Tuesday, February 18, 2014

Spinach & Scallion Quiche

Breakfast is such an important meal and one of my favorite; when I actually have time to eat it. I've been trying to get better a bringing a warm breakfast to work instead of smoothies and yogurt. A warm meal is just more enjoyable on a cold morning. Pre-made/home made breakfast sandwiches have been my go to lately but this week I decided to try and make a quiche. This was my first go at a quiche and it turned out perfectly! I am looking forward to playing around with the ingredients and coming up with some more creative ideas but for now check out my spinach quiche recipe.


Pie Crust
1 stick of butter, cold and cut into cubes
1 1/4 cups of flour
pinch of salt 
pinch of sugar
1/4 cup ice cold water 

Place the butter, flour, salt and sugar into a food processor. Pulse until it starts to breakdown the butter then slowly pour in the water. Pulse again until the flour starts to look evenly crumbly. Pour the mixture onto a lightly floured surface, using your hands form a small disk out of the crumbs. Wrap the disk in plastic wrap and place in the fridge for 1 hour.

Pre-heat the oven to 425. Prepare a pie pan for the dough by rubbing it with butter. Remove the crust from the fridge and roll into a large circle. Place the dough into the pie pan pressing it down and then cut the tops off evenly. Place a piece of foil over the dough then add the pie weights on the foil then place it in the oven and bake for 10 minutes. 

Filling
3 oz cream cheese
3 eggs
1/3 cup milk
1 tbs butter
1 shallot, sliced
1 garlic clove, chopped
8 oz frozen spinach, thawed and drained
pinch of salt
1/4 cup jack cheese (any cheese will do)

Heat the butter in a skillet on medium heat, cook the onions and garlic 3-5 minutes then remove to cool. Meanwhile, place the cream cheese, eggs and milk in a bowl and mix with hand or stand mixer until smooth. Add the spinach, cheese sat and onion mixture into the eggs and cream and mix with a fork. Pour the mixture into the pie pan and bake at 350 for 25 minutes. Let it stand for 15 minute before serving or place in the fridge and serve cold. 


Waffles with Coconut Cream Sauce

My boyfriend never craves food or has a hankering for anything, when he told me he wanted waffles for Valentine's Day dinner I was delighted to whip some up! I thought about cutting them into hearts but that felt wasteful, instead I decided to spruce them up a bit by making a coconut cream sauce. We had some amazing Maryland maple syrup in the fridge so we indulged in some extra sugar but if your watching your sugar intake the coconut cream works fine alone. 
This is a super easy dish and tastes wonderful and goes very well with a bottle of Mumm Brut Rose.  


Coconut Cream
1 can full fat coconut milk
3 tbs powdered sugar
1 tsp vanilla


Separate the coconut water from the can of coconut milk and set it aside. You don't want to use the thin liquid for this recipe set it aside and use it for a smoothie or something else later. 

Place the coconut fat, sugar and vanilla into a bowl and whisk with mixer on high until it becomes light and fluffy. Place in the fridge until read to use. 


Waffle Batter
2 cups of flour
1 tbs baking powder
1/4 tsp salt
2 tbs sugar

Mix and set aside. 

2 eggs
1 tsp vanilla
1 1/2 cups of milk (almond milk works well too)
1 tbs pecan oil (vegetable oil works too)

Mix well then pour into dry, mixing well until the mixture is smooth. Heat a waffle iron and pour the batter in as directed by instructions for the iron. 

Fixins
pecans, crushed
maple Syrup (optional)
strawberries, sliced

When the waffles are ready top with a little coconut cream and add crushed pecans and a little syrup or any other fixins you like and enjoy! 

Notes:
If you refrigerate the coconut milk the night before in a small bowl it will stiffen up more like whip cream when you whip it, otherwise the cream sauce worked for me! 

Thursday, February 13, 2014

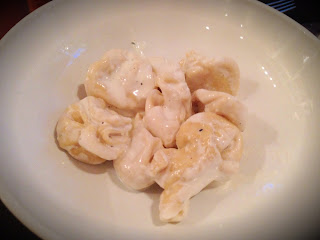
Pear & Pecorino Stuffed Pasta with Gorgonzola Cream Sauce

Pear & Pecorino Stuffed Pasta with Gorgonzola Cream Sauce is one of my the best dishes I had Florence this summer. I found this dish at an amazing little restaurant called Ristorante Natalino, a short walk from Piazza Santa Croce. The restaurant is a cute little place filled with locals where the owner is the hostess and sometimes your server. There were so many appealing dishes on the menu but the owner recommended this dish, and she was right. It was amazing and I savored every little bite. This dish drew me back to Ristorante Natalino three more times while I was in Florence. I made sure to note the ingredients in the dish so I could successfully remake this dish when I got home. I hope that you will give this pasta a try so you can get the chance to enjoy this amazing pasta. 


Ingredients
Makes 4-5 Servings

Step 1 - Pasta
200 grams or 2 1/2 cups flour 
2 eggs
pinch of salt


Place the flour on a smooth surface and create a well in the middle. Crack the eggs into the well and slowly beat the eggs. Once the eggs are scrambled, start slowly adding in a little flour at a time with and continue to mix with a fork. Keep mixing until you can't use the fork and start kneading the dough with your hands. Continue to knead for 10 minutes. If the dough is sticky add in a little flour at a time until you have an elastic ball. 
Cover in plastic wrap and set aside for 30 minutes. 

Step 2 - Filling
2 Bartlett pear, peeled and shredded or finely diced
1 cup marscapone cheese
1 cup pecorino cheese
cracked pepper

Combine all ingredients in a bowl, mix well and place into the fridge.

Step 3 -Sauce
1 tbs butter
1 tsp garlic, minced
2 cups heavy cream or milk
4 oz of crumbly Gorgonzola

Place all ingredients into a very large pan, bring to a simmer on medium/high heat until the cheese melts. Once the cheese has melted turn the heat to a low and cover until pasta is ready. Add more cream if needed to thin it out.
Meanwhile bring a large pot of water to a slow boil.

Step 4 - Stuff em! 
Use a pasta roller to foll out your dough until it is thin. I thin mine from 0-6. You can either make traditional ravioli squares and cut off the edges or you can make Santa bags like I did above. To do this cut the dough into 2" rectangles and place a small spoon of stuffing into the middle. Grab all four ends of the dough and bring them together, connecting the side of the dough and twisting to close the seam. Continue to flour the pasta so it doesn't stick. Once all of the pasta is stuffed, carefully drop a few at a time into the boiling water. Once the pasta floats it is ready. 

Remove the pasta with a strainer and place into the sauce. Continue to do this until all of the pasta is cooked. Serve warm with chopped parsley garnish.

Buon Appetito! 

Sunday, February 2, 2014

Shrimp Étouffée


 I grew up eating some of the most amazing seafood dishes so I crave Cajun food quite often. Recently I have had a hankering for crawfish etouffée. Living in the mountains is amazing but I do miss good ol' Louisiana seafood and it is impossible to get Louisiana crawfish in Lake Tahoe. I really needed to kick my craving for crawfish etouffée so I decided to make it with shrimp instead. This dinner was amazing, it really hit the spot and reminded me a little bit of home. 

Typically my family uses Tony Chachere's Seasoning to add a little Cajun flavor but to their food but for my dish I decided to use a new seasoning, Slavo Salt. Slavo Salt is a yummy seasoning that helps bring out the flavor in just about any dish. It is a simple seasoning without any additives or preservatives.
slavosalt-13.5oz
Slavo Salt! http://slavosalt.com/
Gather up the follow ingredients and get ready to make a yummy Louisiana style dinner for your friends and family! 

Ingredients
Makes 4-6 servings
1 small onion, finely chopped
3 garlic cloves, finely chopped
1 celery rib, finely chopped
1 green bell pepper, finely chopped
1/3 cup of butter
2 green onions, chopped 
1 tbs parsley, chopped
1 can diced tomatoes in juice
2 cups broth - homemade broth recipe below
3 tbs flour
1 lb shrimp, peel and devain
Season with Salvo Salt and Paprika

3 cups of cooked rice

Heat the butter in a large sauce pan or medium pot until it melts. Add in the onions, garlic, celery and bell pepper and cook for 5 minutes on medium heat. Next add in the  green onions, parsley and tomatoes, cook for a few more minutes. Mix the flour into 1/4 cup of the broth until smooth then add along with the rest of the broth to the dish and bring to a boil, stirring frequently. Reduce to a simmer, add in the shrimp and seasoning, cover and cook for 5 minutes on medium/low heat.  

Taste the dish and add more seasoning as needed. Serve warm over rice, garnish with paprika and sliced green onions. 


Shrimp Broth 
Homemade broth is easy to make from ingredients you are already using to make your dinner. I prefer to make my broth 30 minutes before using it but you can use after 15 in your in a rush. I usually take that time it's setting to prep my vegetables and set the table. 

2 1/2 cups of water
1/2 small onion
2 garlic cloves
1 celery rib
1 carrot 

bell pepper ends from ingredients above
shrimp carcasses from ingredients above 

Chop the vegetables in large chunks and place a pot along with the water and shrimp carcasses. Bring to a boil, reduce to a simmer and let sit for at least 15 minutes. Once you are ready to use the broth pour it thought a fine mesh strainer into a cup or bowl.